Well if your here you it's a reasonable assumption that your are
a little curious about the hydroponic system I'm working with. Well I'll go through some things in detail.
Most of what I have learn has been through searching and reading through the internet, some books, actually going
down and taking notes of different systems with hydroponices.
I'm running a system that is like from General Hydroponics called
AeroFlow, which last year (2002) I have changed to run more like a system that is called NFT. So you could
call me a hafe breed. I will share more about why later. Even so the garden is growing quite well!
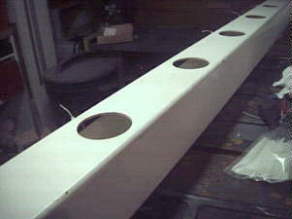
I bought 5X5 PVC Fence posts for the nutrient channels holding the
plants. These posts are UV protective, this is important to keep your system aways working for you not against you.
Two reasons, one that the PVC will not brake down in a year or so, and two so you will not have any warping. Your channels
need to be level to control an accurate water level for all the cups down the channels.
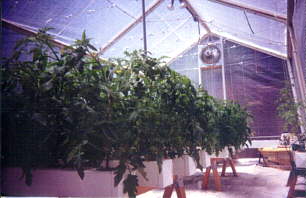
As the picture shows inside along the top inside corner runs a black 1/2 inch plastic pipe
held in place by plastic zip ties. Almost all of my plumbing is done with Rain Bird drip system parts you would buy
at a home and garden store.
For the aeroponic system I have I drilled a 1/32th inch hole in the black pipe to spray
on each cup. Well that does work if those hole do not clog up! Which they will if you do not install a inline
filter! I installed a filter that Rain Bird makes that I can clean just by unscrewing the cap. This works great and I installed it comming out of
my pump above my Nutrient tank, before going on into the channels. The filters really keep your system working and your
roots cleaner.
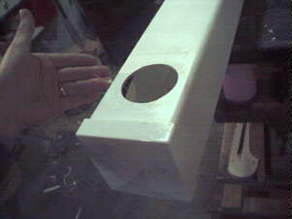
Buy two end caps for each length of channel. You will need
to drill your 1/2 hole for your inside pipe on the tank side. This will need to be as high as you can to the top corner
because water can leak from this hole if your water level is high. I would not seal around the hole, if you work
on your system it's easer to slip out your pipe. As for the end caps glue with your PVC glue and seal them with bathroom
calking on the outside so no water will leak.
Now back to the aeroponic/NFT thing. At first I did not see how to work-in a filter for
my system so I changed to only one BIG spray hole at the end of my channels.(NFT System) This helped not clog up
as easy and I did two other things along with it to improve it. So I could get in to clean the hole I did
not grow a plant in the last hole, but just made a cover to put over the cup hole. Second I installed fishtank airstones
in the netrient tanks, this helps replace some of the O2 in the water I was getting from each of the sprayers. Plants
love the O2 in water. I could easly go back to the aeroponic way now that I have my filters in place. This
is my plan for next year, now I have my plants well on their way.
Aroponics is known it be one of the fastest growing systems in the
field of hydroponics, which is why I wanted to go this route. The idea is the roots are mostly out of the water
wet in the air, dark and with humidity they grow very fast. This with the temp controlled inside and out side you get
some real growth fast.
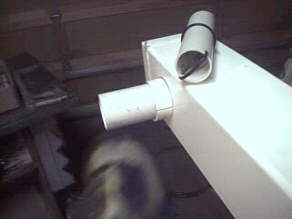
With the drain over flow tube you will need to raise and lower your
water level with the growth of your roots. I came up with a method that works great and something I could make and not
spend alot of money. In this picture I have the drain over flow tube on it side to show you how it works,
it would be point down in the nutrient tank normally.
Basically it's PVC pipes that sleeve into them selfs. Three of them, one right under
the bottom cut small and glued to support the longer. These two cannot be move, but are made to hold the last tube
which does move up and down inside to raise and lower your water level. The tube that moves has an O-ring and a zip-tie
for a handle. In the picture it's the one setting up on the channel.
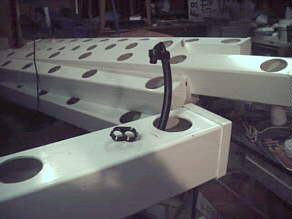
Here is a picture working on one of the ends of a channel.
You can see how I took the end of the 1/2 black pipe and folded it on to its self to close off the end. Useing
a black part made just for such a thing from Rain Bird. You can see the holes for the cup placements. I chose
the tomatoes plants to be sixteen inchs apart because of space in my greenhouse. It would be great to space them twenty
or more to give them more room, more room means more sun, more sun means more tomatoes. At sixteen inches apart
they are a little hard to work around but I wanted to add more plants to fit in my greenhouse.
In the background you can see the tank side of the channels because
the end holes are bigger so you can get your hand in it to raise and lower the drain over flow pipe. You will also
see that that hole is father apart then the cup holes. This was so you can get to it after your plants are growing in
size.
This next picture you can see
the plumbing for the manifold going to the channels from the pump. All of it is made from Rain Bird drip system. Any
Drip system that works with hafe inch black pipe should work. You want to add parts to allow your system to easly come
apart for cleaning once a year and to change your system around if you wish. Like me, I wanted to chang a unit
over to one corner and it was done with no problem.
I use for the four channel unit, a fifty gallon fish pond pump,
to get the spay I like. Sometimes I think I could larger, but it work fine. With my system I choose not to
turn off, but always going. These magnetic pumps use very little power and I have had them work for over five years
in our fish pond.
The nutrient tank I use is a hundred gallon sheep tank that I have covered the top with a sheet of the thick installation board.
I also wapped installation around the side to protect the water temp from heat and cold.
I cut covers from extra PVC post to fit over the drain over flow hole to keep the sun light
out. Do make covers for any holes that you do not have plants for.
More hydro system photos:
- Dec of 2003 took out everything to change my layout. This was my floor lay out for the last two years. My plan is to change
it too be more friendly for over head lights and long rows to make it easyer to lay the tomato vines down as they grow.
They were like building a birds nest with this lay out. New
- Filters were added spring 2002 and have been a great plus. They keep the solution from
clogging up the jets and keep the solution clean which helps for clean roots and the tanks stay clean. They are Rain-Bird fliters for hafe inch black pipe.
- Here is what I use for my pollinator, it's a stick taped to a back massager
which in put it under the stem of the blossoms. It works great, my bug pollinator. I am deadly allergic to bees!
- Here are my first two systems I made you can see the old way I made the manifold out of PVC pipe.
|